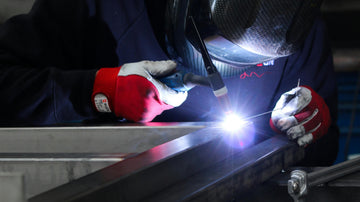
Welding 6061 aluminum gives many welders headaches, but getting good at it can seriously up your fabrication game. This lightweight workhorse isn't like other metals—its heat-loving nature and stubborn oxide layer demand special handling that's different from working with steel.
Going from raw aluminum to a solid weld involves key steps you just can't skip. Miss one, and you'll likely end up with porous, cracked, or weak joints that give out when you need them most.
Tired of contaminated welds, warped projects, and disappointing results? We're about to break down exactly how the pros tackle this tricky metal—from proper prep work to those finishing touches that make your projects look shop-quality. Stick around and your next 6061 project might just become your new portfolio piece.
Upgrade your aluminum welding capabilities with our professional-grade aluminum welders. Engineered specifically for the challenges of 6061 and other aluminum alloys, these machines deliver consistent results when it matters most.
What is 6061 Aluminum?

6061 aluminum is one of the most versatile and widely used aluminum alloys in the manufacturing industry. This heat-treatable alloy offers an excellent combination of strength, workability, and resistance to corrosion that makes it ideal for a range of applications.
Composition and Characteristics
6061 aluminum belongs to the 6000 series of aluminum alloys, which are primarily alloyed with magnesium and silicon. Its typical composition includes:
- 97.9% Aluminum
- 0.8-1.2% Magnesium
- 0.4-0.8% Silicon
- Small amounts of copper, chromium, zinc, and titanium
This alloy offers a good strength-to-weight ratio, with a tensile strength of 45,000 psi in the T6 temper condition. It provides excellent corrosion resistance, even in harsh environments where other metals might deteriorate.
The "T6" designation you'll often see (6061-T6) refers to the heat treatment process that significantly improves the alloy's strength. This process involves solution heat treatment followed by artificial aging.
Applications and Common Uses
You'll find 6061 aluminum in countless applications across multiple industries due to its versatility. Some common uses include:
- Structural components: Building frames, truck bodies, bridges
- Marine applications: Boat hulls, underwater equipment, dock systems
- Automotive parts: Wheels, chassis components, trim pieces
- Machinery parts: Valves, pistons, gears
The alloy's excellent machinability makes it popular for precision components. Its durability and corrosion resistance make it suitable for outdoor applications where exposure to weather is a concern.
Many food and beverage industries also utilize 6061 for equipment parts due to its non-toxic properties and resistance to staining.
Challenges When Welding 6061 Aluminum
When tackling 6061 aluminum, you'll bump into several roadblocks that make this material trickier than most. Here's what you're up against:
- Stubborn oxide layer - This pesky surface layer melts at a whopping 3,700°F, while the aluminum underneath liquifies at just 1,200°F. Skip cleaning it off, and you'll get contamination and weak joints.
- Heat sensitivity issues - The T6 heat treatment that gives 6061 its strength doesn't play nice with welding heat. Expect a heat-affected zone (HAZ) where strength drops by 30-40%.
- Filler metal confusion - Surprisingly, using 6061 as filler is a bad move. Most pros reach for 4043 (with 5% silicon) or 5356 filler metals instead.
- Preheating problems - Unlike steel, preheating 6061 can actually hurt more than help, causing the alloy to over-age and lose its mechanical properties.
Pre-Welding Preparation Steps
Proper preparation is crucial for successful aluminum welding. Taking time to correctly prepare 6061 aluminum will prevent common welding defects and ensure strong, quality welds.
Material Cleaning Techniques
Before striking an arc, you need to get that 6061 aluminum spotless - here's how:
- Remove all contaminants - Oil, grease, and dirt are your enemies, causing porosity and weak spots if left behind.
- Use the right solvents - Grab acetone or non-chlorinated solvents for cleaning. Stay away from chlorinated products which create toxic fumes under welding heat.
- Attack stubborn oils - For persistent grime, apply an aluminum-specific degreaser, then wipe with clean, lint-free cloths until nothing transfers to the cloth.
- Protect prepped surfaces - Even fingerprints contain enough oil to ruin a weld. Once cleaned, wear gloves when handling the material to maintain that pristine surface.
Removing Oxide Layer
Once you've tackled general cleaning, you'll need to address aluminum's most notorious problem:
- Target the invisible barrier - That oxide layer melts at 3700°F while your aluminum base turns liquid at just 1200°F, creating a recipe for poor fusion if ignored.
- Use aluminum-dedicated tools - After degreasing, grab a stainless steel wire brush that's never touched other metals. Regular brushes leave iron particles that will ruin your weld.
- Brush with purpose - Work in one direction with firm pressure until the surface transforms from dull to bright and shiny. This is your visual confirmation the oxide is gone.
- Work against the clock - Fresh aluminum starts oxidizing immediately after brushing, so plan your workflow to weld within 2-3 hours of this final prep step.
- Consider chemical assistance - For critical joints, follow your mechanical cleaning with aluminum-specific chemical cleaners for even better oxide removal.
Joint Design for 6061 Aluminum
Proper joint design is critical when welding 6061 aluminum. The material's thermal conductivity requires specific considerations for successful welds.
For butt joints in material thicker than 1/8", create a 60-70° V-groove with a small root face. This provides sufficient access for proper fusion. Consider these common joint preparations:
- Butt joints: Use square edges for thin material, V-groove for thicker pieces
- T-joints: Ensure proper fit-up with minimal gap
- Lap joints: Overlap by at least 3 times the material thickness
Leave a small gap (about 1/16") between pieces to allow for expansion and contraction. Tack welds should be placed at intervals to maintain alignment during the welding process.
Proper Clamping and Fixturing
Securing your 6061 aluminum workpieces properly prevents distortion and ensures accurate welds. Aluminum expands significantly when heated and contracts when cooled, making fixturing crucial.
Use aluminum or copper clamping devices when possible, as steel fixtures can contaminate the aluminum. Position clamps to allow sufficient working space while maintaining firm control of the pieces.
Consider these fixturing tips:
- Use backing bars to support the weld and help dissipate heat
- Create jigs for complex or repeated welds
- Leave room for expansion to prevent warping
- Position clamps at least 1" from the weld area
For complex assemblies, tack weld in a balanced pattern working from the center outward. This distributes heat evenly and minimizes distortion. Pre-bending components slightly in the opposite direction of expected distortion can help achieve straighter final results.
Selecting the Right Welding Process
Choosing the proper welding process for 6061 aluminum significantly impacts the strength and quality of your final weld. The welding method you select must account for aluminum's thermal conductivity, oxide layer, and the specific properties of 6061 alloy.
TIG Welding for 6061 Aluminum

TIG welding (GTAW) is the preferred method for 6061 aluminum when quality and precision are priorities. This process gives you excellent control over heat input, which is crucial for aluminum's high thermal conductivity.
When TIG welding 6061:
- Use AC current to help break down surface oxides
- Maintain a clean tungsten electrode (2% thoriated or pure)
- Set your amperage between 125-200A depending on material thickness
- Keep a tight arc length of 1/8" to 1/4"
TIG produces clean, high-quality welds with minimal spatter. This method works particularly well for thinner 6061 materials and when appearance matters.
The slower pace of TIG welding allows better heat management, reducing the risk of warping or burn-through that can occur with 6061 aluminum.
Achieve precision results on your 6061 projects with our aluminum TIG welders. These advanced systems provide the AC capabilities and heat control essential for professional aluminum fabrication.
MIG Welding for 6061 Aluminum

MIG welding (GMAW) offers faster welding speeds for 6061 aluminum projects with larger welds or production requirements. This process uses a continuously fed wire that serves as both electrode and filler material.
For MIG welding 6061 aluminum:
- Use pure argon shielding gas at 20-30 CFH
- Select "spray transfer" mode with proper voltage settings
- Use push technique (10-15° push angle)
- Set wire feed speed between 300-500 IPM for typical applications
MIG works best for material thicknesses above 1/8". The faster deposition rate makes it ideal for larger projects.
Remember to use a spool gun or push-pull system to prevent wire feeding issues common with soft aluminum wire.
Optimize your production efficiency with our aluminum MIG welders. Featuring specialized wire feed systems designed for aluminum's unique properties, these machines minimize downtime and maximize throughput.
Choosing the Correct Filler Material
Selecting the right filler rod is critical for successful 6061 aluminum welds. The two most common options are 4043 and 5356 alloy fillers.
4043 (Al-Si) filler rod:
- Lower melting point than 6061
- Flows better and creates smoother welds
- Less prone to hot cracking
- Ideal for applications requiring machinability
- Better for anodizing when color matching is important
5356 (Al-Mg) filler rod:
- Produces stronger welds with better ductility
- Better corrosion resistance in salt environments
- Higher tensile strength than 4043
- Less sensitive to contamination
- Recommended for structural applications
6061 Aluminum Basic Welding Techniques
Nailing the right techniques for 6061 aluminum makes all the difference between frustration and clean, strong welds.
Proper Torch Angle and Movement
Your torch position and movement create the foundation for a successful weld. Get these basics right before worrying about anything else:
- Keep your torch 10-15 degrees from vertical for ideal gas coverage while still seeing what you're doing.
- For TIG welding, dominant hand controls the torch while your other hand feeds filler at a 15-20 degree angle.
- Use smooth, consistent movements—slight weaving for thick stuff, straight pushing for thin material.
- Practice small circular motions at starts and stops to prevent crater cracks where 6061 is most vulnerable.
Managing Heat Input
Aluminum's low melting point means heat control is your make-or-break skill. These guidelines will help you maintain that delicate balance:
- Begin with lower amps (roughly 1 amp per .001" thickness) and increase gradually until you see proper fusion.
- Keep interpass temps below 250°F using temp sticks or an infrared thermometer—anything hotter and you'll slash strength by 30-50%.
- Use pulse settings on modern machines to manage heat while maintaining penetration.
Dealing with Thermal Conductivity Issues
That lightning-fast heat transfer in aluminum requires special tactics. Here's how to stay ahead of it:
- Remember the 5x factor - Aluminum spreads heat five times faster than steel, so adjust your approach accordingly.
- Use heat sinks - Copper backing bars help draw excess heat away from thin sections to prevent burn-through.
- Try the step-back method - Weld in small increments with cooling breaks between to maintain even temperature throughout.
- Adjust on the fly - Reduce amperage as you progress since aluminum gets more conductive as it heats up.
Preventing Warpage and Distortion
Fighting distortion starts before you strike an arc. These strategies will help keep your projects straight and true:
- Lock it down - Use sturdy fixtures and strategic tack welds before starting the main welds.
- Plan your attack - Work with staggered or backstep patterns, moving from center outward on complex pieces.
- Balance your welds - Alternate sides when possible to counteract pulling forces.
- Speed up (strategically) - Faster travel with proper heat input reduces total energy dumped into the piece.
- Try pre-bending - For precision work, position parts slightly out of alignment to compensate for expected movement during cooling.
Post-Welding Treatments
Once your 6061 aluminum welds cool, your work isn't finished. These crucial post-weld steps transform a rough-looking joint into a professional, durable finished product.
Cleaning After Welding
Those fresh welds need immediate attention to prevent contamination and set the stage for any further treatments:
- Attack residues first - Use an aluminum-dedicated stainless steel brush to remove flux and oxide without contaminating the surface.
- Wipe down thoroughly - Apply acetone or mild alkaline solution to eliminate oils, fingerprints, and contaminants that could cause problems later.
- Consider sound waves - For intricate parts, ultrasonic cleaning reaches tiny crevices where brushes can't, using sound waves to dislodge embedded particles.
- Protect yourself - Always wear gloves, eye protection, and ensure good ventilation when handling cleaning chemicals.
Heat Treatment Options
Your welding heat just weakened the 6061's carefully engineered strength. Here's how to get it back:
- Understand what happened - The heat-affected zone has dropped from T6 temper strength to approximately T4 or lower—a significant loss.
- Let time work (if you can wait) - Natural aging over 30-60 days will partially restore strength without additional effort.
- Speed up recovery - For faster results, artificial aging at 400°F for one hour can recover much of the original tensile strength.
- Manage expectations - Remember that filler materials like 4043 respond differently to heat treatment than the base 6061, creating zones with varying properties.
Surface Finishing Methods
The right finish not only looks better but significantly extends your project's lifespan:
- Consider anodizing - This electrochemical process creates a protective oxide layer that resists corrosion and can be dyed in various colors.
- Choose your anodizing type - Sulfuric acid anodizing delivers thickness and wear resistance, while chromic acid anodizing offers superior corrosion protection.
- Prep surfaces carefully - Before finishing, create uniform appearance by sanding or bead blasting, working through progressively finer grits for smoother results.
- Explore alternatives - Powder coating provides impact resistance and color options, while chemical conversion coatings offer different functional properties for specific applications.
Quality Control and Inspection

Even the most experienced welders need to verify their work on 6061 aluminum. Proper inspection catches problems before they become costly failures.
Common Defects in 6061 Welds
Every welder should know these typical aluminum welding problems to prevent and identify them:
- Porosity problems - Those tiny gas bubbles trapped during solidification weaken your weld. Look for small, round holes on the weld surface that resemble Swiss cheese.
- Fusion failures - When the weld metal doesn't properly bond with your base metal, you'll see gaps or lack of penetration that significantly compromise joint strength.
- Crack concerns - Watch for thin, dark lines running along or across your weld. Hot cracks form during solidification, while cold cracks develop after cooling.
- Distortion issues - Aluminum's high thermal expansion makes 6061 prone to warping, especially in thinner sections that can't resist the pulling forces as the weld cools.
Testing Weld Integrity
Different inspection methods offer varying levels of assurance that your welds will perform as needed:
- Start with your eyes - Visual inspection catches many problems—look for consistent bead appearance, proper size, and absence of undercut or overlap.
- Try the dye trick - Dye penetrant testing reveals surface cracks invisible to the naked eye by seeping colored liquid into tiny defects.
- Test actual strength - For critical applications, tensile testing measures exactly how much load your weld can handle, accounting for strength loss in the heat-affected zone.
- See inside your welds - X-ray or ultrasonic testing provides the ultimate verification for high-stress applications by revealing internal flaws other methods miss.
Repairing Defective Welds
When you discover problems, a methodical repair approach prevents compounding the issues:
- Start fresh - Thoroughly clean and completely remove defective areas using aluminum-specific grinding wheels or carbide burrs.
- Address root causes - For porosity, improve gas coverage (aim for 20-30 CFM) and clean materials thoroughly before attempting repairs.
- Chase cracks completely - Remove the entire crack, not just the visible portion—partial removal guarantees the crack will return.
- Limit heat cycles - Remember that each repair further degrades the aluminum's properties. After multiple repairs, consider heat treatment to restore strength.
Invest in reliable aluminum welding performance with our wire welders for aluminum. Purpose-built for challenging materials like 6061, these systems help fabricators deliver quality results on schedule and within specification.
Conclusion on Welding 6061 Aluminum
Mastering 6061 aluminum welding doesn't happen overnight, but the journey is worth every minute spent perfecting your technique. By following the proper preparation steps, understanding the unique challenges of this versatile alloy, and applying the right welding and finishing methods, you'll produce stronger, cleaner, and more professional results.
Remember that patience pays off when working with 6061. Take the time to thoroughly clean your material, remove that stubborn oxide layer, and adjust your heat input appropriately. Your careful attention to these details will be rewarded with welds that not only look great but also maintain structural integrity under stress.
Ready to expand your aluminum welding knowledge? Check out our article on Military Grade Aluminum to learn about the specialized alloys used in defense applications and how their welding requirements compare to the 6061 techniques we've covered here.
Frequently Asked Questions about Welding 6061 Aluminum
Welding 6061 aluminum requires specific knowledge and equipment. Here are answers to common questions about welding this popular aluminum alloy.
Can aluminum 6061 be welded?
Yes, aluminum 6061 can be welded. It's one of the more weldable aluminum alloys available. However, when 6061-T6 is welded, it loses 30-50% of its strength in the heat-affected zone (HAZ).
You should always use filler metal when welding 6061 to prevent cracking. Autogenous welding (without filler) is not recommended for this alloy.
What aluminum cannot be welded?
Some aluminum alloys in the 2xxx series (containing copper) and 7xxx series (containing zinc) are difficult or impossible to weld. These alloys are prone to hot cracking and stress corrosion.
Aluminum casting alloys with high silicon content can also be challenging to weld. Always check the specific alloy properties before attempting to weld.
What kind of welder do you use for aluminum?
TIG (Tungsten Inert Gas) and MIG (Metal Inert Gas) welders are most commonly used for aluminum. Both use inert gas shielding, typically pure argon, to protect the weld from oxidation.
For TIG welding aluminum, you need an AC (alternating current) capable machine. For MIG welding, you need a spool gun or special wire feeding system designed for soft aluminum wire.
Is MIG or TIG better for welding aluminum?
TIG welding produces higher quality, cleaner welds on aluminum and offers better control, especially on thinner materials. It's preferred for precision work and visible joints.
MIG welding is faster and easier to learn, making it better for production work and thicker materials. For 6061 aluminum plates thicker than 1/4 inch, MIG welding becomes more practical.
Can you weld aluminum with a regular welding machine?
Standard stick welders or basic MIG machines designed for steel cannot weld aluminum properly. You need a TIG welder with AC capability or a MIG welder with special aluminum features.
Some newer multi-process welders can handle aluminum if they have the right settings and accessories. You'll also need the appropriate shielding gas and filler metals specific to aluminum.
Which type of weld joint is not recommended for aluminum?
Lap joints without proper edge preparation are not recommended for aluminum. These joints can trap moisture and contaminants, leading to corrosion and weld failure.
Butt joints on thick aluminum plates should not be welded without proper V-beveling and root gaps. When welding 6061-T651 plates, you need single V-groove configurations with proper preparation for full penetration.