Ever wondered how a welder turns a drawing into a strong weld? Welding symbols are the key, telling welders exactly what to do to get the job done right. These symbols are crucial for making sure every weld meets safety and design standards. Knowing how to read and use these symbols is a must-have skill for welders to avoid mistakes and produce top-notch work.
This guide breaks down welding symbols, explaining each part clearly. You'll see examples of how these symbols are used in real jobs, so you can turn plans into strong, reliable welds. Learning this language is essential for any serious welder. Keep reading to get the hang of welding symbols and step up your welding game.
Fundamentals of Welding Symbols
Welding symbols are graphical representations of a weld and its requirements. These symbols are used to communicate important information about the weld to the welder, inspector, and engineer. Several basic components make up a welding symbol, including the reference line, arrow, basic weld symbols, supplementary symbols, and finish symbols.
The reference line is the horizontal line that runs through the center of the welding symbol. The arrow points to the location where the weld is to be made. Basic weld symbols are used to represent the type of weld that is required, and supplementary symbols are used to provide additional information about the weld. Finish symbols are used to indicate the surface finish of the weld.
Types of Weld Joints
There are several types of weld joints, and each one requires a different type of welding symbol. The most common types of weld joints include butt joints, corner joints, lap joints, and T-joints.
A butt joint is a joint between two pieces of metal that are aligned in the same plane. A corner joint is a joint between two pieces of metal that are perpendicular to each other. A lap joint is a joint between two pieces of metal that overlap each other. A T-joint is a joint between two pieces of metal that are perpendicular to each other and form a T shape.
Welding Positions
Welding positions are used to describe the position of the weld joint in relation to the welder. There are four main welding positions: flat, horizontal, vertical, and overhead.
The flat position is when the weld joint is horizontal and the welder is welding from above. The horizontal position is when the weld joint is horizontal and the welder is welding from the side. The vertical position is when the weld joint is vertical and the welder is welding from the bottom up. The overhead position is when the weld joint is above the welder, and the welder is welding from below.
Welding Symbol Elements
When it comes to welding symbols, there are four main elements that you need to be familiar with. These elements are the reference line, arrow, tail, and weld and arrow side. Understanding each of these elements is crucial to being able to read and interpret welding symbols correctly.
Reference Line

Image credit: https://weldguru.com/welding-symbols/
The reference line is the main horizontal line that runs through the center of the welding symbol. All other elements of the symbol are positioned in relation to this line. The reference line is often the first thing that you will see when looking at a welding symbol, and it is used to indicate where the weld is to be placed.
Arrow

Image credit: https://weldguru.com/welding-symbols/
The arrow is used to point to the location on the reference line where the weld is to be placed. The arrow can point in any direction, and its length and shape can vary depending on the type of weld that is required.
Tail

Image credit: https://weldguru.com/welding-symbols/
The tail is used to provide additional information about the weld. It is positioned at the opposite end of the arrow from the weld symbol and can contain information such as the type of weld, the welding process to be used, and any additional instructions.
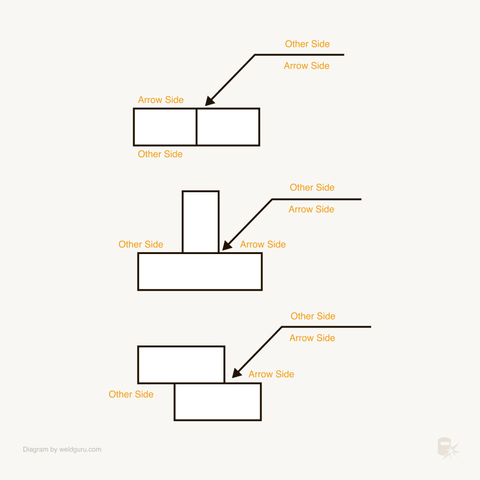
Weld and Arrow Side
The weld and arrow side of the symbol is used to indicate which side of the joint the weld is to be placed on. This is important because it can affect the strength and integrity of the weld. The weld and arrow side is indicated by a symbol that looks like a half arrowhead, with the flat side of the arrowhead pointing towards the joint.
Types of Welds
When it comes to welding, there are three main types of welds: groove welds, fillet welds, and plug and slot welds. Each of these welds serves a different purpose and requires a different technique to execute properly.
Groove Welds
Groove welds are used to join two pieces of metal that are in a groove or channel. This type of weld requires the use of a filler material, which is melted and used to fuse the two pieces of metal together. Groove welds can be made in a variety of shapes and sizes, depending on the specific needs of the project.
Fillet Welds
Fillet welds are used to join two pieces of metal that are perpendicular to each other. This type of weld is made by placing a filler material in the corner where the two pieces of metal meet and then melting it to fuse the two pieces together. Fillet welds are commonly used in construction and fabrication projects.
Plug and Slot Welds
Plug and slot welds are used to join two pieces of metal that are overlapping. This type of weld requires the use of a filler material, which is melted and used to fuse the two pieces of metal together. Plug and slot welds can be made in a variety of shapes and sizes, depending on the specific needs of the project.
Supplementary Symbols
In addition to the basic welding symbols, there are several supplementary symbols that are used to provide additional information about the weld. These symbols are used in conjunction with the basic symbols to fully specify the weld.
Contour Indications
Contour indications are used to indicate the shape of the weld. They are represented by a series of lines that are drawn perpendicular to the weld symbol. The lines are used to indicate the shape of the weld, such as concave, convex, or flat.
Finish Symbols
Finish symbols are used to indicate the type of finish that is required on the weld. They are represented by a series of lines that are drawn perpendicular to the weld symbol. The lines are used to indicate the type of finish, such as grind, chip, or smooth.
Weld All Around and Field Weld Symbols
Weld all around and field weld symbols are used to indicate that the weld is to be made all around the joint or in the field, respectively. The symbols are represented by a circle or a flag, respectively, that is attached to the basic weld symbol.
Interpreting Welding Symbols
Reading the Symbol
Welding symbols are graphical representations that convey information about the weld. These symbols are used to communicate the type of weld, the size and location of the weld, and any additional information that is necessary to ensure that the weld is performed correctly. To read a welding symbol, you must be familiar with the different elements that make up the symbol.
Understanding Dimensions and Angles
Dimensions and angles are important elements of welding symbols. They provide information about the size and shape of the weld, as well as the angle at which it should be performed. Understanding these elements is essential to ensuring that the weld is performed correctly.
Significance of Other Details
In addition to dimensions and angles, welding symbols may also include other details that are important for the welder to know. These details may include the type of weld, the welding process to be used, the material to be welded, and any special instructions or requirements.
Conclusion
It's clear that welding symbols are not just random marks on a page but the vital connection between a project's plans and its final, physical form. A welder's ability to accurately interpret these symbols is fundamental to the integrity and strength of their work. With the knowledge you've gained here, you're now well-equipped to tackle any project with confidence, ensuring your welds are not only strong but precisely what the blueprint intended.
As you apply this newfound understanding to your projects, perhaps you're also considering the tools that will best serve you in your endeavors. Whether you're welding in a professional setting or carrying out projects at home, the right equipment is paramount. For insights into the best welders for home use that can help you apply these symbols in practice, be sure to check out our selection at Arc Captain. Find the perfect welder to match your expertise and transform those symbols into strong, lasting welds with ease.
Frequently Asked Questions
How do you read welding symbols?
Welding symbols are read from left to right, just like reading a sentence. The arrow points to the joint that needs to be welded, and the symbol above or below the line tells you what type of weld is required. The dimensions and other important details are also included in the symbol.
What are 3 commonly used codes in welding?
Three commonly used codes in welding are AWS (American Welding Society), ASME (American Society of Mechanical Engineers), and API (American Petroleum Institute). These codes provide guidelines for welding procedures, qualifications, and inspections.
What does M mean in welding?
The M symbol in welding stands for "Machining". It indicates that the weld needs to be finished by machining to meet the required dimensions and tolerances.
What is the broken arrow symbol in welding?
The broken arrow symbol in welding indicates that the weld is to be made on the arrow side of the joint. This is often used when welding pipes or other cylindrical objects.
What is the Z symbol in welding?
The Z symbol in welding represents a fillet weld. It is used when two pieces of metal are joined at a right angle and a triangular-shaped weld is needed.
Are welding symbols universal?
Yes, welding symbols are universal. They are used worldwide and are recognized by welders, engineers, and inspectors in all industries. However, some countries may have their own additional symbols or variations of existing symbols.
